Wednesday 22 September 2021

Take a trip journey to travel- Bee Arty DT inspiration

 I love revisiting my favourite trips and memories, that why I enjoy photography and making art journals.

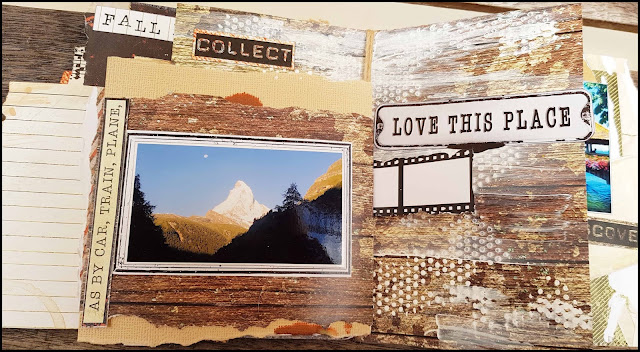
Using 'Destination Anywhere' designed by Queenie T I created my own handmade journal to keep some of my memories of my Swiss holiday and I'd like to share with you how I made it.

Products used from the Destination Anywhere kit: 

12"x12" pages .

Phrases and words from phrase page

Die Cuts: Transport

Stencils: Drippy-A6, .

Wooden, paper and material embellishments.

ColourBlast/BeeArty products: 

White heavy gesso

Colour Artist ink- Rust

Stencils: Pavement

Step1,2 & 3a

  • I selected a range of pages and ripped or cut them into different sizes and a edges. 

  • Folding them provided me with a booklet style journal. 

  • I cut out a plane using the Diecut template 'Transport', some words, tags and phrases.


Step 4 & 5:

  • To add texture I applied white gesso over different section of the pages with the 3 different stencils.


Step 6 & 7:

  • To add another effect I used the front of the stencil before the gesso dried and placed it onto a page and used a wet one to rub it over the stencil which left a shadow effect.  On another page I placed gesso over the spotted section and then smeared gesso over it with my soft sponge brush.


Step 8:

  • I also smeared some onto a plain page and when dry dropped small amounts of artist ink 'rust' and wiped it with the same soft sponge brush. 

  • A few other ink colours were dropped from a height to produce large splats.

Step 9:

  • After completing the base additions to the pages I built up the layers with the smaller sections of papers, phrases, natural material elements and photos. The journal was completed by staking the pages together and tying a piece of natural string around the folded sections twice and tying off.


Some closeups:


Thanks for joining me and I hope I inspired you to check out this amazing kit and the products at beearty.com.au . You can find more inspiration and links on BeeArty's facebook page https://www.facebook.com/BeeArtyHive


Wednesday 8 September 2021

I Spy With My Little Eye- BeeArty DT inspiration


 Hi, everyone. I have been having fun with the new fluoro colours and incorporated my love of journaling with my other love of art on canvas. For today's blog post I'd like to share my process of my latest canvas art 'I Spy With My Little Eye'.

Products used:

A4 black canvas

White A4 card stock

Fluoro colours- Green, Orange, Pink, Yellow

Modeling paste 

A range of Colour Blast stencils- 'Boxed in'. 'Free Hand', 'Lined',

Stamps: 'Making Tracks' and past stamps including an eye and script stamp

Black and white gesso

Black Archival ink

Drawing ink black and white

Tissue paper or paper dress making pattern

Gel medium- as a glue

Arrows and phrase from kits. 


Step1- I drew and then cut out sections from the white A4 to make a template/stencil.

Step 2- I smeared white Gesso using a spatula over 3 of the outer sections, then I mixed the Fluoro yellow with some white gesso and smeared the mixture over the remaining outer sections carefully ensuring a straight edge was made. I smeared a small amount of the yellow mix onto the white sections to connect the areas. 


Step 3- I made a mix of the Fluoro Orange and white gesso to partially fill the rectangle left in the centre, I smeared some orange into the other sections to connect them to the centre colour palette.

Step 4- Using the old dress makers pattern I stamped 2 images of the Eye stamp with Black Archival ink 

- I tore around the stamped images,…. images blend better without straight edges…


Using the gel medium as a glue I coated the backs of the images and glued them onto the canvas.

Step 5: I added layers of different coloured shapes using black gesso and continued to add further layers with a variety of stencils, stamps and drawing ink.

I also added colour using the fluoro powders to the eyes adding a very small amount of water to the powder (a drop) to ensure depth of colour. 


Step 7- I added the final layer that included a Phrase ‘ I spy with this little eye” which I double backed to make it stand out, and some arrows I painted with fluoro paint.


Here are some closeups for you to see:


Thanks for joining me and I hope I inspired you to check out the great products and art supplies at beearty.com.au . You can find more inspiration and links on BeeArty's facebook page https://www.facebook.com/BeeArtyHive


Thursday 8 July 2021

Travel and Explore- Bee Arty DT

 Hi everyone hope you are all doing well and getting time to create your own beautiful art. I'd like to share one of my latest pieces, I love to spend time at the beach and with the cold weather arriving here in South Aussie it's time to remember the beautiful memories of traveling on the sea feeling free and being warm!!! 

For this page I used papers from one of the latest kits 'Destination Anywhere' by Queenie Yeung.

I used from the 'Destination Anywhere' Kit.: 12x12 page 'Starts here'

Tags phrases/words from 'Parcel' and the back of the cover page.

World and postcard from 'Arrival'

Stencils - 'Pavement' and 'Boxed in' from the 'Untangled' range.

Heavy White Gesso

Colour Blast Mica Powder 'Olive Grove' 

Colour Blast Colour Paste 'Envy', 'Stormy Weather', 'Just blue' and 'Snow White'
 
Thin craft cork A4 mat 

Page of music.
 
String.
 
Archival Ink- Black


Step 1-I used some gel medium to glue down some music paper to the cork.
 

 Step 2- Using the pages  'Parcel', the back of the cover page and 'Arrival' I cut out tags phrases, words,  and postcard, edging them all with black Achival Ink. 


Step 3- I used a spatula to smear 3 colours of Colour Paste over the 'Boxed in' stencil; 'Envy', 'Just Blue' and 'Snow White' onto the music and cork. I let this layer dry thoughly, placing it infront of my gas heater quickened to process.
.

Step 4- Using the 'Stormy Weather' Colour Paste over the 'Placement' stencil in the same way added another dimension and colour to the page. It's important to let the paste dry thoughly before doing the next layers.


Step 5- I experimented with placement of words, tags and photo. A hole was punched into the tag hole section and a small piece of string was connected. 

Step 6- The cork page was glued onto the 12"x12" 'Starts here' page. Using the mica powder 'Olive Grove' and a brush loaded with water, I made a concentrated paint to add around different sections of the page. I also decided to find a few more elements to add to the pages to  help connect the two pages together.


Here are some closeups for you to show you the details:


Thanks for joining me and I hope I inspired you to check out this amazing kit and others at beearty.com.au . You can find more inspiration and links on BeeArty's facebook page https://www.facebook.com/BeeArtyHive


Wednesday 26 May 2021

Simply beautiful- Bee Arty DT


Hi hope everyone is enjoying their week. I have always had a problem of knowing when to stop and when to add more or not, so today I decided to go back to my old style of simple is best. I have always loved white space so here is my take on going back to simple and beautiful using ' Fearless, Brave and Free' paper range by Fiona Paltridge.


I used:  Papers - Frames and Phrases 'Free', Circles 'Collections' 'Within' 'Leap' and the B sides of 'Confidence' and 'Chance'

12x12 white cardstock 

Music paper coloured with a wash of 'Lagoon'

Black cardstock to back title

Colour Blast Artist Ink- 'Sunburst'

Colour Blast Colour Spray- 'Lagoon', 'Carribean', 'Road base' 

colour Blast Shimmer dust- 'Amber'

Archival ink- black

Black wire


Step 1- I sprayed a small amount of 'Lagoon' onto the right side of the paper ensuring that there was minimum spray in the area. 


Step 2- Using the 'Carribean' spray I unscrewed the top and dropped droplets of colour over the 'lagoon' colour. Moving the paper helped the ink move, make patterns and mix. I let it dry slightly before adding more droplets so that I didn't get a large puddle. By placing the corner of a wet one into the puddle can draw up excess ink. 

Step 3- Whilst the ink is drying it's a good time to cut out the phrases, frames and shapes needed to be layered together to add dimension and colour. I used the artist dye ink 'Sunburst' to add red to the hearts to the frame.

 Step 4- Picking out a title and backing it with back card stock makes the title pop so after adding this to the page I decided to add arrows to connect the title and the layers. Remembering all the time.... simple don't add to much. I felt there was too much white space so I used the 'Lagoon', 'Carribean', 'Road base' and some 'Amber' shimmer dust mixed with a small amount of water to add splats. 

Sometimes things don't go to plan so if 2 colours mix that spoil the look you can do what I did and find some of the 'chance' circles cut them out and cover the area and then of course add a few more to even out the look. Mistakes can add a dimension you didn't think of before. 


Here is some closeups for you to look at:


Thanks for joining me and I hope I inspired you to check out this and other amazing kits at beearty.com.au . You can find more inspiration and links on BeeArty's facebook page https://www.facebook.com/BeeArtyHive 


Sunday 16 May 2021

Family Love


 Hi everyone, Great to see so many people doing the most amazing creating. Today I'm here to inspire you to go back and find some of your left overs and even thou this has lots of fussy cutting it is a quick and simple layout to do.


 I used the papers from 'Grateful Heart' kit by Michelle to create this page.

The products included:

- Pages from 'Grateful Heart kit': Blessed (Words1), 'Love' (Side A), ' Faith' (Side B), 'Gathers' (Side A), Black Cardstock 'Together'(Side B edge)

-Colour Shimmer Dust: 'Lush', 'Amber', 'Sunflower', 'Peacock', 'Paris', 'Candy'


Firstly I cut out the flowers, leaves, bird, heart and phrase that I need to layer under the photos are chosen to use. I chose 3 that showcased our beautiful grandies and some of the special moments we cherished. 

I layered a piece of torn white wood 'Faith' paper and the edge of the 'Together' patterned paper over the top of the black 12"x12" cardstock which is in the kit and attached them together with double sided tape.

I use my phone to take photos of different placements of the flowers etc and review the photos to chose my favourite layout. Doing this then provides me with a copy of the final placement to refer back to when I glue it all down finally. I added some torn cardboard under the bird area to lift the bird up to give the page more dimension and with the photo of the boys using the binoculars it worked really well.


Using the colours of Amber, Paris, Sunflower, Candy, Peacock and Lush Colour Shimmer Dust I placed a very small amount into individual sections of the palette and added water to make a watercolour to paint my fussy cut elements. Several layers of colour painted on top of each other in different areas gives more depth to the page. 


For a deeper colour I placed a small amount 'Lush' powder onto my work mat and dipped my wet brush onto the powder and transferred it onto the sections I wanted dark.


I also added some paint along the patterned paper above the title phrase to bring in another colour element to connect the edge with the rest of the painted area. 


Here are some close ups for you to check out.


Thanks for joining me and I hope I inspired you to check out this amazing kit and others at beearty.com.au . You can find more inspiration and links on BeeArty's facebook page https://www.facebook.com/BeeArtyHive